The first step towards installing any Vrui-based software, including the Augmented Reality Sandbox, is installing some version of the Linux operating system on a new computer, which might sound like a daunting proposition to those who have never done that kind of thing before, but is actually very straightforward. This guide will be using the current (as of 12/17/2018) version 19, code-named “Tara,” of Linux Mint, one of the most popular and user-friendly Linux distributions.
Hardware Requirements
As this guide is geared towards installing and running Vrui-based 3D graphics applications, it assumes that the computer onto which Linux is to be installed is some type of “gaming” or “VR ready” PC, containing an Nvidia GeForce graphics card. The exact model of graphics card, as well as the exact model of CPU, amount of main memory, and hard drive size are not really important (that said, to run 3D graphics applications effectively, the PC should have a recent CPU, at least 4GB of main memory, and at least 60GB of hard drive space). While AMD/ATI graphics cards are otherwise perfectly serviceable, they have traditionally had inferior Linux driver support, and therefore Vrui and Vrui applications have not been tested on them in quite a while. In other words, we do not recommend them for these purposes.
Preparation
Before installing Linux, one needs to download an installation image for one’s chosen Linux distribution and flavor, and copy it to an installation medium, like a CD/DVD or USB stick. For this guide, we will be using the 64-bit version of Linux Mint 19 (“Tara”), with the MATE desktop environment. The page in the preceding link offers a 1.9GB disk (“iso”) image via a wide selection of download sites all over the world. Click the link for the site that is located most closely to you, and wait for the download to finish.
The next step is to “burn” the downloaded disk image file to an installation medium. Instructions for several operating systems and media types can be found on the Linux Mint site.
Base System Installation
If the installation medium created in the previous step is a USB drive, plug it into a USB port on the new computer before turning it on for the first time. If it is a CD/DVD, turn the computer on first, and then insert the medium as quickly as possible.
The next step is to tell the computer to boot from the installation medium instead of from its internal hard drive. There is usually a key that needs to be pressed shortly after powering on the computer; typically either the “Delete” key to enter the computer’s BIOS, or “F8” to enter a boot menu. If this does not work on the first try, and the computer “hangs” or boots into whatever operating system was previously installed on it, don’t wait until it finishes booting — just turn it right back off (or press the reset button if it has one) and try again. We are going to erase any previous operating system anyway, so there’s no harm. However, do wait for about 20-30 seconds between turning the computer off and on again to avoid any danger of electrical damage. If neither the “Delete” nor “F8” keys work, look in the computer’s manual or online for the correct key sequence. Amazingly, finding the correct key to boot from the installation medium is by far the most difficult step of installing Linux Mint.
Once a BIOS screen or boot menu show up, select to boot from the installation medium. From there, it will take a few seconds to boot into a “live” Linux Mint environment, see Figure 1.
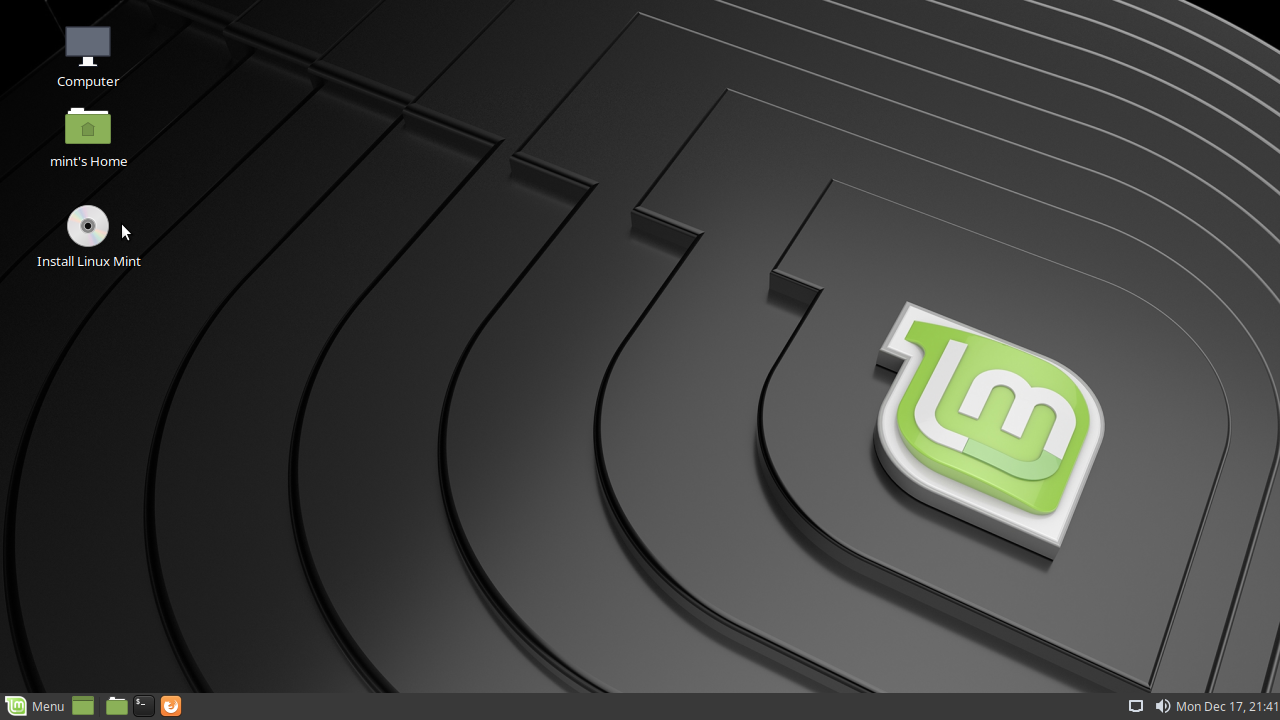
Figure 1: Linux Mint’s “live” installation environment.
This “live” environment is a fully-functioning Linux system, and you can already try some of the installed applications. However, it’s best not to dawdle, and directly double-click the “Install Linux Mint” icon. That will open the installer, which will guide you through the rest of the installation (see Figures 2-11). Basically, each step requires making some choices (or sticking with the defaults), and then pressing a “Continue” button. The first steps, see Figures 2 and 3, are selecting the installation language and keyboard layout.

Figure 2: Selecting the installation language.

Figure 3: Selecting the keyboard layout.
In the next step, see Figure 4, the installer will ask whether you want to install third-party software such as graphics card drivers. That is generally what we want, but I recommend leaving this option unchecked, and dealing with alternative drivers after base system installation is complete. There are fewer chances for things to go wrong that way.
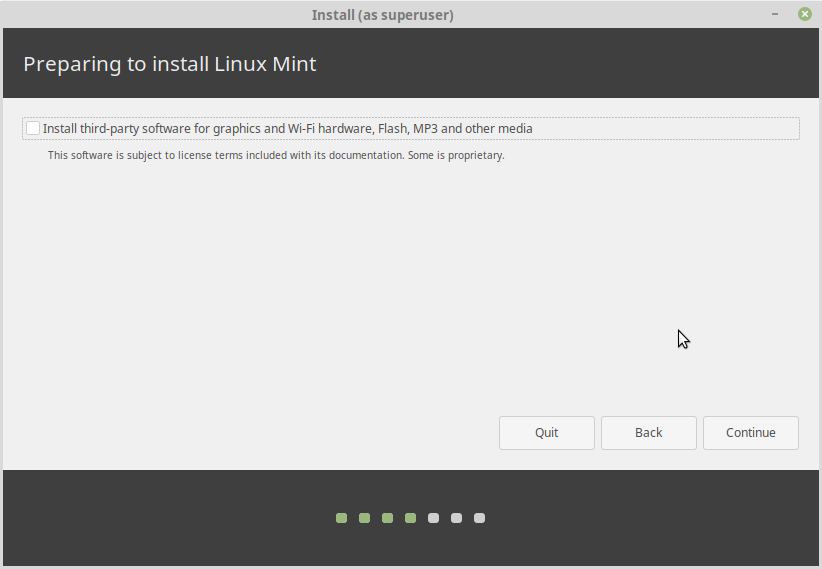
Figure 4: To install, or not to install, third-party drivers, that is the question. We’ll leave this unselected and do it later.
The next step, see Figure 5, is where it gets interesting. At this point, the installer will have checked the computer’s hard drive for already-installed operating systems. If it found one, it will offer to retain the existing system and install Linux Mint alongside it, or completely remove the the existing system. Both options are valid. If there is already another operating system on the computer, say some version of Microsoft Windows, and you want to be able to select which operating system to load at boot-time, then you should check the first option. This is supposed to work reliably, but I myself have not tested it. If going this route, you will be presented with a menu every time you turn on the computer, and will have to choose with operating system to use.
The other option is to completely wipe the hard drive and install Linux Mint as the only operating system (if there is no pre-existing operating system, this is the only option). If you want to set up an AR Sandbox in “kiosk mode,” where the computer has neither a keyboard nor mouse, and powering it on will automatically start the AR Sandbox, you must choose the second option, or it will not work reliably.
The rest of the installation instructions assumes that you chose the second option. If you chose the first option, follow any additional prompts from the installer.

Figure 5: Decide whether to install Linux Mint alongside an existing operating system, or wipe the hard drive.
In the next step, see Figure 6, you will select to which hard drive to install Linux Mint. If your computer has multiple hard drives, double-check to make sure that you are installing to the right one. There will be another confirmation dialog, see Figure 7, but this is where things will start happening. Carefully read the description of what the installer is going to do, double-check the installation destination, and click the “Install Now” button when you are confident. Then double-check again and read the warning shown in Figure 7, and click the “Continue” button when you are certain you want to proceed.
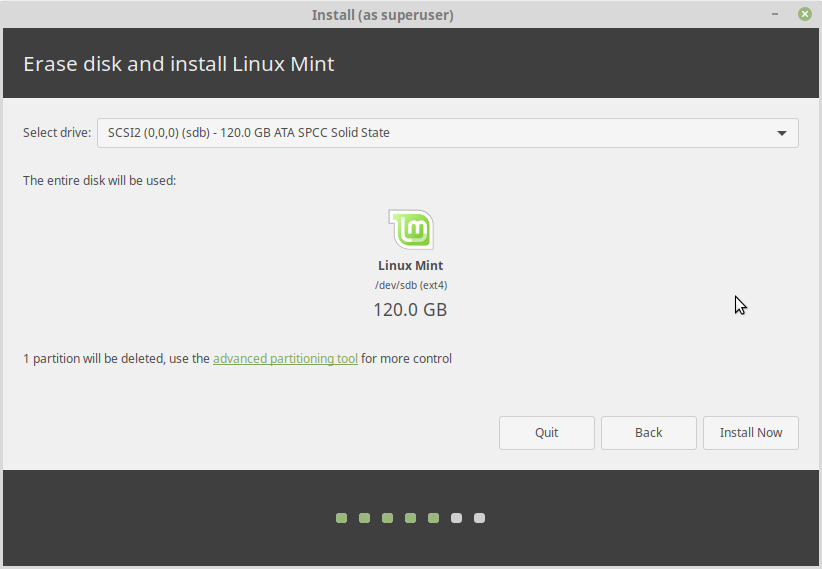
Figure 6: Double-check the installation destination, read the fine print, and click “Install Now.”

Figure 7: Double-check again. If you click “Continue” in this dialog, the installer will start writing to the selected hard drive(s).
At this point, the installer will shrink, reformat, or erase the selected installation hard drive(s) and start installing the final Linux Mint system. While doing so, it will ask a couple of additional questions, see Figures 8-9.
First, the installer will let you choose your location and time zone, see Figure 8.
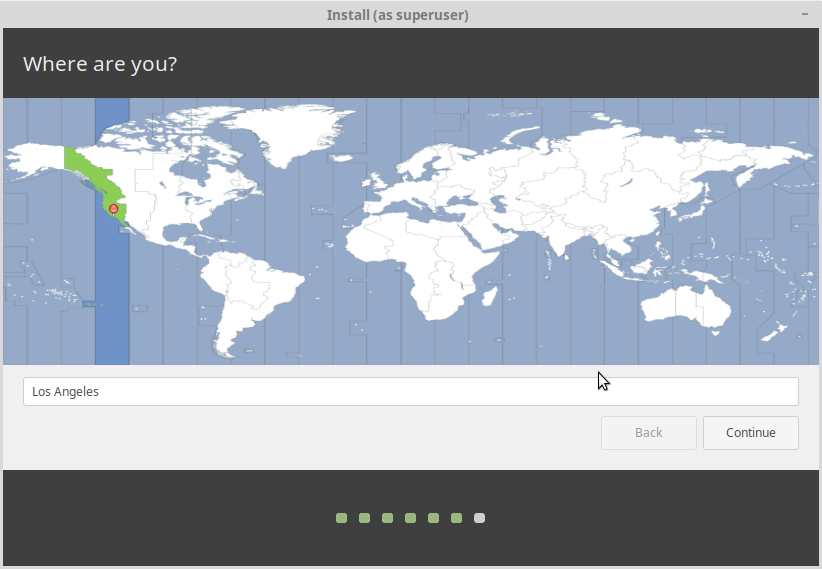
Figure 8: Select your location and time zone.
Next, the installer will ask your full name, let you choose a login ID and password, and a name to identify the computer, see Figure 9. In home or equivalent set-ups you can choose any computer name you like, but if you want to embed the computer into an existing network, you should ask your local IT administrator.
In the general case, do not select the “Log in automatically” option, and do select the “Require my password to log in” option. Only if you want to set up an AR Sandbox in kiosk mode, do the opposite. This will let you run the AR Sandbox application with neither a mouse nor a keyboard connected.

Figure 9: Selecting a user name/password, computer name, and deciding whether to allow automatic log-in.
This was it; from this point on, the installer will continue copying files to the selected hard drive and show a slide show of Linux Mint features, see Figure 10. Depending on the speed of your hard drive, this might take upwards of 5 minutes. When installation is complete, the installer will show a confirmation message and offer to reboot the computer to start the newly-installed operating system, see Figure 11. To do so, click the “Restart Now” button, wait for the message asking you to remove the installation medium, and then press “Enter” to reboot.
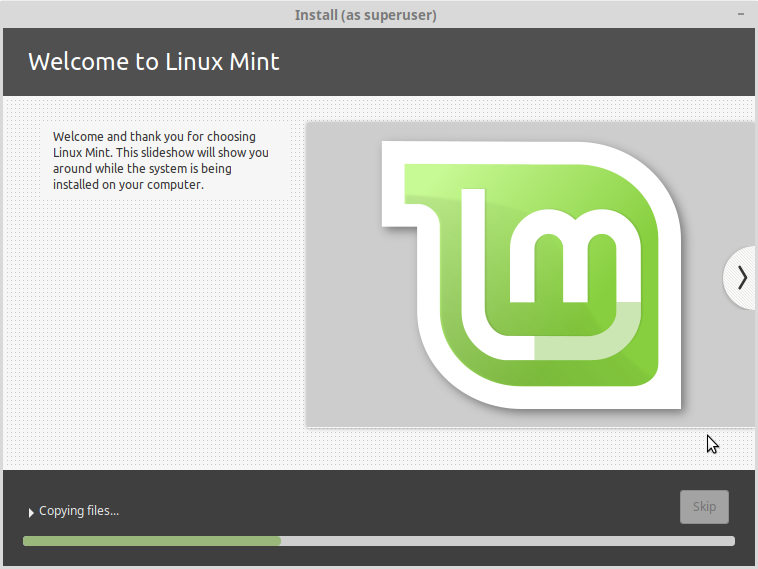
Figure 10: Waiting for installation to complete.

Figure 11: Installation is complete; time to reboot to continue with the next stage.
Graphics Card Driver Installation
If base system installation completed successfully, the computer will boot into the newly-installed operating system. If “Log in automatically” was not selected in the dialog in Figure 9, the computer will show the Linux Mint login screen, where you need to select your user name from the list and enter your password to enter the desktop. If “Log in automatically” was selected, it will drop you straight onto the desktop.
Linux Mint’s default desktop will look mostly identical to the “live” environment shown in Figure 1, minus the “Install Linux Mint” icon. Upon logging in for the first time, Mint will show a “Welcome” screen, see Figure 12.
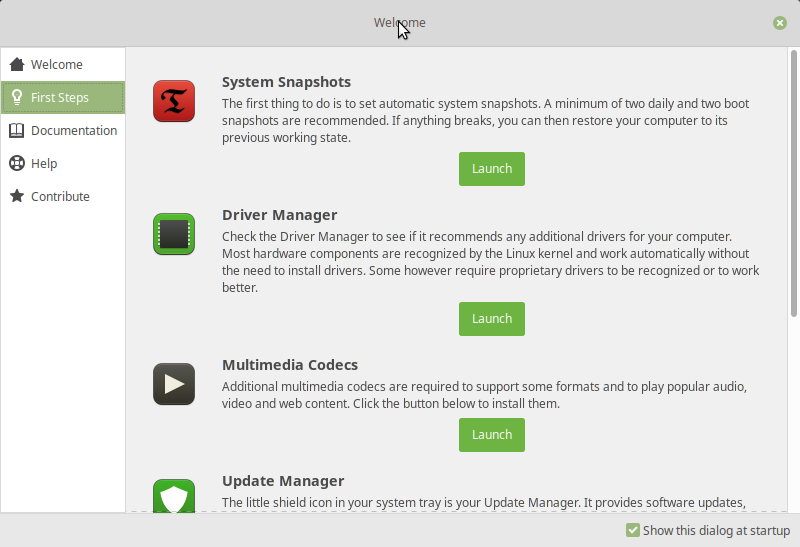
Figure 12: Linux Mint’s “Welcome” screen, from where we can install third-party graphics card drivers.
To install third-party graphics card drivers for the Nvidia GeForce card, click on the “First Steps” page in the left column, and then the “Launch” button underneath the “Driver Manager” heading in the right column. This is an administrator-level change, and Mint will ask you for your password before proceeding, see Figure 13.
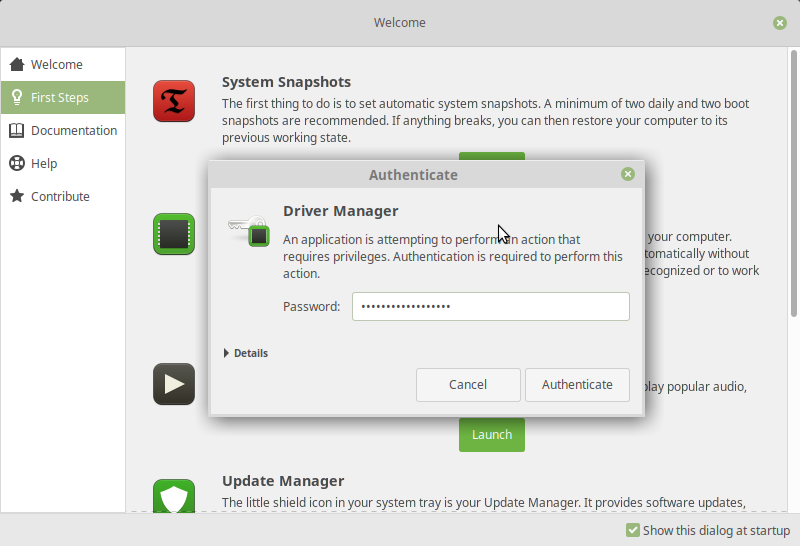
Figure 13: Enter your password to open the Driver Manager.
The driver manager will show which graphics card driver is currently installed, and which alternative drivers are available, see Figure 14. If you followed these instructions and left “Install third-party software…” unchecked in the dialog shown in Figure 4, the current driver should be the open-source “xserver-xorg-video-nouveau” driver. What we need, however, is the recommended (and proprietary and closed-source) Nvidia driver, in this case version “nvidia-driver-390.” The open-source driver does not work well enough to run demanding 3D graphics application, especially VR applications or the AR Sandbox.

Figure 14: Check the currently-installed graphics card driver.
Select the recommended driver, see Figure 15, and then click the “Apply Changes” button.

Figure 15: Select the recommended driver, and click “Apply Changes.”
This will download the recommended driver software and install it, which may take a few minutes. When the installation is complete, the Driver Manager will give you the option to restart the computer to activate the new driver, see Figure 16. Click the “Restart…” button, follow any additional instructions, and log back in when the login screen re-appears.
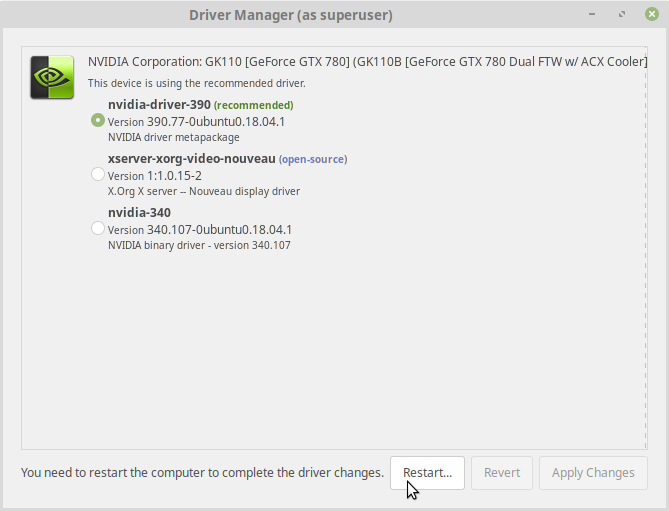
Figure 16: Restart the computer a second time to activate the recommended graphics card driver. This will be the last restart.
Once logged back in after the computer restarts, it is time to check that the graphics card driver installation was successful. To do this, open a terminal window. You can do this either by clicking on the terminal icon in the panel at the bottom edge of the screen (it’s the black rectangle with a dollar sign (“$”) in it, see Figure 1), or by right-clicking anywhere on the desktop, and selecting “Open in Terminal” from the menu that appears.
When you have a terminal window, enter exactly the following command into it and press the Enter key (the $ sign indicates the terminal’s input prompt; don’t type it):
$ glxinfo | grep vendor
This command is called a “pipe,” and one of the ways in which the UNIX/Linux command line lets you do nifty things. This will come in handy later. In detail, glxinfo is a utility program that prints a ton of information about the installed graphics card (run just glxinfo by itself to see). Instead of showing you all that text, the vertical bar (also called “pipe”) directs that text into the grep program, which is a filter that only shows you lines of text that match a certain pattern. In this case, “grep vendor” only shows lines that contain the keyword “vendor,” which are exactly the ones you need to see at this point.
The terminal should reply with three lines of text, see also Figure 17:
server glx vendor string: NVIDIA Corporation
client glx vendor string: NVIDIA Corporation
OpenGL vendor string: NVIDIA Corporation
If any of those lines show a vendor other than Nvidia, something went horribly awry, and you might have to visit Linux Mint’s support forum to find a solution.
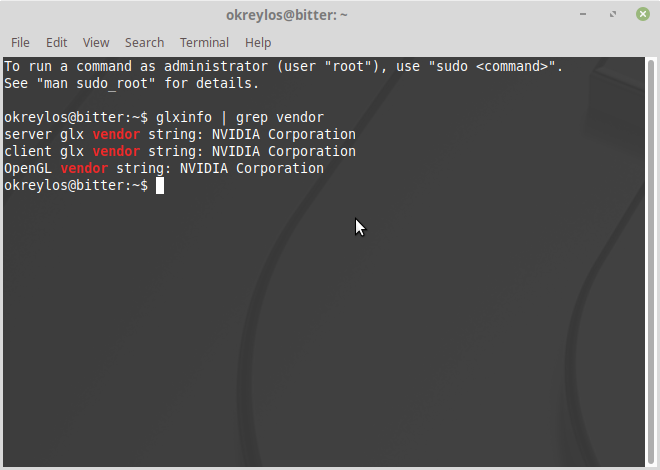
Figure 17: Checking if the Nvidia graphics card driver was installed correctly.
Success!
If you made it to this point: congratulations! You now have a Linux Mint system with high-performance drivers for your graphics card, and are ready to install the Vrui VR toolkit and Vrui-based applications, including the Augmented Reality Sandbox.
At this point, you could also update your Linux Mint system from the software versions that were packaged onto the installation medium to whatever the most recent software versions in the on-line repositories are (to do so, launch the “Update Manager” from the welcome screen’s “First Steps” page, see Figure 12). This is recommended for a general-use system, but you do not have to do it for a computational appliance, such as an AR Sandbox in kiosk mode, which will never again be connected to the network.

Pingback: An Illustrated Guide to Connecting an HTC Vive VR Headset to Linux Mint 19 (“Tara”) | Doc-Ok.org
Where do you get the Linux drivers for the Nvidia GTX 1060?
You follow the steps in section “Graphics Card Driver Installation,” Figures 12-16.
What if no drivers show up on the driver manager?
Very informative.