It’s been more than two years since the last time I posted set-up instructions for Vrui and HTC Vive, and a lot has changed in the meantime. While Vrui-5.0 and its major changes are still not out of the kitchen, the current release of Vrui, Vrui-4.6-005, is stable and works very well with the Vive. The recent demise of our CAVE, and our move towards VR headsets until we figure out how to fix it, have caused a lot of progress in Vrui’s set-up and user experience. The rest of this article contains detailed installation and set-up instructions, starting from where my previous step-by-step guide, “An Illustrated Guide to Connecting an HTC Vive VR Headset to Linux Mint 19 (“Tara”),” left off.
If you did not follow that guide and its prerequisite, “An Illustrated Guide to Installing Linux Mint 19 (“Tara”),” this one assumes that you already have:
- a “gaming” or “VR ready” PC with a powerful Nvidia GeForce graphics card,
- a full installation of a 64-bit Ubuntu-based Linux operating system, e.g., Ubuntu or Linux Mint, with the MATE desktop environment,
- proprietary drivers for the Nvidia graphics card installed and working,
- head-mounted display filtering disabled in the graphics card driver,
- and a working installation of SteamVR.
If you use a Linux distribution that is not Ubuntu-based, such as my own favorite, Fedora, or another desktop environment such as Gnome Shell or Cinnamon, you will have to make some adjustments throughout the rest of this guide.
This guide also assumes that you have already set up your Vive virtual reality system, including its tracking base stations, and that your Vive headset is connected to your PC via HDMI and USB (I will publish a detailed illustrated guide on that part soon-ish).
Installing Vrui
The Vrui VR development toolkit is distributed as tarballs (gzip-compressed tar archives) containing source code, documentation, other resources, and build scripts. Installing Vrui (and most other software distributed in source form) typically requires four steps:
- Install required libraries (the list of libraries required to build Vrui can be found in its “Quick Installation Guide“).
- Download the tarball containing the desired version of Vrui and unpack its contents somewhere inside the user’s home directory.
- Configure and build the Vrui software (via make).
- Install the Vrui software (via sudo make install).
To simplify these steps, Vrui offers installation scripts for Ubuntu- or Fedora-based Linux distributions on its download page. The fastest way to download and run one of those scripts is by entering exactly the following sequence of commands into a terminal window (the dollar signs ($) indicate the terminal’s input prompt and must not be typed in):
$ cd
$ wget http://www.idav.ucdavis.edu/~okreylos/ResDev/Vrui/Build-Ubuntu.sh
$ bash Build-Ubuntu.sh
If you are using a Fedora-based Linux distribution, replace “Build-Ubuntu.sh” with “Build-Fedora.sh” in the commands above. The script run in the last command will ask you for your user’s password to install prerequisite libraries, and then build Vrui. That will take a little while and produce lots of output, and at the end, if everything worked, you’ll be greeted by a spinning globe in a window. Once you’re done admiring the globe, you can close the window.
The script executed the four steps listed above. Additionally, it created a directory called “src” underneath your home directory, and unpacked the current Vrui tarball into a directory called “Vrui-<major>.<minor>-<release>” (e.g., Vrui-4.6-005) inside that “src” directory.
Check for SteamVR and Vive Support
While Vrui is not itself based on SteamVR, it uses SteamVR’s low-level hardware drivers to talk to the Vive headset and receive 6-DOF tracking and event data from it and its controllers. As an aside, this means that Vrui needs SteamVR to be installed on the local computer, but it does not require actually running SteamVR. On the contrary, it is best not to run Steam and/or SteamVR when using the Vive with Vrui applications, as doing that could cause compatibility issues.
During configuration, Vrui’s build system attempts to detect whether the local computer has SteamVR installed, and builds in support for Vive headsets if it succeeds in finding a SteamVR installation. I have tested this detection code on several versions of Steam and SteamVR and multiple Linux distributions, but it might still fail in rare cases, for example if SteamVR was installed in a non-standard location.
To check whether Vrui found SteamVR, scroll back through the output from the Build-Ubuntu.sh script to where it prints:
---- Vrui installation configuration ----
Somewhat below that, look for lines that either state
OpenVR SDK and SteamVR run-time exist on host system; support for
HTC Vive enabled
or
OpenVR SDK or SteamVR run-time do not exist on host system; support
for HTC Vive disabled
If it printed the former, everything is fine, and you can skip ahead to section “Running the Vive Tracking Driver.” Otherwise, continue with the next section.
Manually Enable SteamVR Support
If Vrui’s build system did not find your SteamVR installation, you will have to find it yourself, and re-run the last two installation steps manually. First, you will need to look for a directory called “SteamVR”, inside a directory called “common”, in turn inside a directory called “steamapps” or similar. If you do not know where to look, you can run the following command in a terminal window:
$ find / -name SteamVR
This will search your entire file system for directories or files called “SteamVR”, which might take some time. Look through the output from “find,” and note down the line that ends with “/common/SteamVR”, such as the following from my own SteamVR installation:
/work/okreylos/GameData/Steam/SteamApps/common/SteamVR
Next, open a terminal window and enter the Vrui source directory:
$ cd ~/src
$ ls
$ cd Vrui-<major>.<minor>-<release>
The second command will print the list of sub-directories inside the “src” directory. Identify the one containing Vrui, and replace “Vrui-<major>.<minor>-<release>” in the third command with the correct name. Then continue in the same terminal window:
$ rm bin/VRDeviceDaemon
$ make STEAMVRDIR=<location of SteamVR directory>
In the second command, replace <location of SteamVR directory> with the full directory name you noted down from the output of “find.” For example, I would enter:
make STEAMVRDIR=/work/okreylos/GameData/Steam/SteamApps/common/SteamVR
This command will show Vrui’s configuration options again. It should now print
OpenVR SDK and SteamVR run-time exist on host system; support for
HTC Vive enabled
and below that line three lines with directory or file names:
SteamVR run-time root directory: <path>
SteamVR run-time library directories: <path1> <path2>
SteamVR Lighthouse driver directory: <path>
The first line will echo back the same directory you passed to “make” as STEAMVRDIR, the second line will list two directories containing “/ubuntu12_32/steam-runtime/amd64/” somewhere inside and ending in “/x86_64-linux-gnu”, and the third line’s file name will end in “/linux64/driver_lighthouse.so”.
If those lines exist, you can now re-install Vrui with Vive support by running:
$ sudo make STEAMVRDIR=<location of SteamVR directory> install
where you pass the same directory name as STEAMVRDIR as before. You might have to enter your password again to make this adminstrator-level change.
Running the Vive Tracking Driver
Now that Vrui is installed with SteamVR/Vive support, it is time to test headset and controller tracking. Vrui uses a stand-alone tracking server called “VRDeviceDaemon.” It is typically started when you begin a VR session, around the same time you turn on your Vive’s display, and keeps running until you end your session and turn the Vive’s display off again. To start the server, open a new terminal window and run:
$ RunViveTracker.sh
RunViveTracker.sh is a script that gets installed as part of Vrui, to simplify running VRDeviceDaemon in Vive mode. It will print a lot of status messages to the terminal during start-up, and then keep printing messages as important events occur. For initial testing, look for messages similar to the following (all serial numbers refer to my devices, and will be different for yours):
OpenVRHost: Activating newly-added head-mounted display with serial number LHR-CCB9BBDB
...
OpenVRHost: Tracked device with serial number LHR-CCB9BBDB is now connected
...
OpenVRHost: Activating newly-added tracking base station with serial number LHB-7FB0B90B
...
OpenVRHost: Tracked device with serial number LHB-7FB0B90B is now connected
...
OpenVRHost: Activating newly-added tracking base station with serial number LHB-B5250EB9
...
OpenVRHost: Tracked device with serial number LHB-B5250EB9 is now connected
...
OpenVRHost: Tracked device with serial number LHR-CCB9BBDB regained tracking
OpenVRHost: Tracked device with serial number LHB-B5250EB9 regained tracking
OpenVRHost: Tracked device with serial number LHB-7FB0B90B regained tracking
The first two messages refer to the Vive headset itself. The next four messages refer to the two tracking base stations, who get detected by the tracking sensors on the headset. The final three messages tell that the two base stations can see each other, that the headset can see one or both base stations, and that 6-DOF tracking was established. In other words, everything appears to be working.
If you now turn on your controllers (by pressing the power buttons below the touchpad), you will get additional messages like the following (again, the serial numbers will be different):
OpenVRHost: Activating newly-added controller with serial number LHR-FFFC3F40
...
OpenVRHost: Tracked device with serial number LHR-FFFC3F40 is now connected
OpenVRHost: Tracked device with serial number LHR-FFFC3F40 regained tracking
OpenVRHost: Device LHR-FFFC3F40 is now discharging
OpenVRHost: Battery level on device LHR-FFFC3F40 is 90%
...
OpenVRHost: Activating newly-added controller with serial number LHR-FF6F3D43
...
OpenVRHost: Tracked device with serial number LHR-FF6F3D43 is now connected
OpenVRHost: Tracked device with serial number LHR-FF6F3D43 regained tracking
OpenVRHost: Device LHR-FF6F3D43 is now discharging
OpenVRHost: Battery level on device LHR-FF6F3D43 is 84%
This tells that both controllers connected to the headset, that they started tracking their positions and orientations, and that they are running on battery and are slowly discharging. VRDeviceDaemon will keep updating the controllers’ battery levels as they drain, and will print messages if any of the devices temporarily lose and then re-gain 6-DOF tracking.
The tracking driver needs to be running for Vrui-based VR applications to use the headset and controllers. I recommend starting it in a new terminal window, and moving the window to a corner of the main display so you can monitor its status (and the battery levels of the controllers). To shut down the tracking driver when your VR session is finished, either press Ctrl+C inside its terminal window, or simply close the window. Shutting down the driver will also power off the controllers.
Creating an Icon for the Tracking Driver
It is convenient to create a desktop icon to start the tracking driver. Right-click anywhere on the desktop, and select “Create Launcher…” from the pop-up menu. In the “Create Launcher…” dialog that appears, set “Type” to “Application,” enter something like “Start Vive Tracker” into the “Name” field, and optionally enter a helpful comment into the “Comment” field.
Most importantly, enter a command to run the tracking driver into the “Command” field. You want to run the driver in its own terminal window, and the best way to achieve that is to use the following command:
mate-terminal --geometry=80x30 -t "Vive Tracker" -e RunViveTracker.sh
This command opens a new terminal window (“mate-terminal”), sets the window’s size to 80 columns by 30 rows, which is a good size, and sets the window’s title to “Vive Tracker” (you can choose any title you like). Finally, the “-e RunViveTracker.sh” option tells the newly-opened terminal to run the tracking driver script.
Click the “OK” button to confirm and create the icon on your desktop. From now on, you can start the tracking driver in its own terminal window by double-clicking its icon.
Testing Tracking
At this point everything should be working, but you still might want to check actual tracking data for any of the devices, or you may want to do this later if you run into any tracking issues down the line. Vrui contains two utilities to check tracking: DeviceTest is a text-based utility, and TrackingTest is a graphical application.
The simplest way to do a quick tracking check is to run DeviceTest in a terminal:
$ DeviceTest -t <tracker index>
where you replace <tracker index> with the index of the device you want to check (0: headset, 1: first controller, 2: second controller). This will continuously print the selected device’s 3D position, and the device’s battery level if it is a controller. To stop DeviceTest and get back to the terminal prompt, press the Enter key.
DeviceTest has a lot of additional options. Add -listDevices to its command line to get details on all connected devices; add -listHMDs to get details on your headset; add -b to see the status of all buttons on all devices; add -v to see the status of all analog axes; and add -o to additionally see the orientation of the selected device, expressed as a rotation around a 3D axis.
Configuring the Environment
Before using any VR applications, you need to tell Vrui the physical layout of your environment, i.e., your VR workspace. Specifically, Vrui needs to know where the center of your workspace is, how high your floor is, which direction you’re generally facing when in your workspace, and the locations of walls, furniture, etc. around your workspace. All this is done using a graphical set-up utility called “RoomSetup.” In a terminal window, run
$ RoomSetup Vive
This will start the configuration utility and tell it to configure an environment for a Vive VR system, see Figure 1. Then follow the procedure outlined in this video:
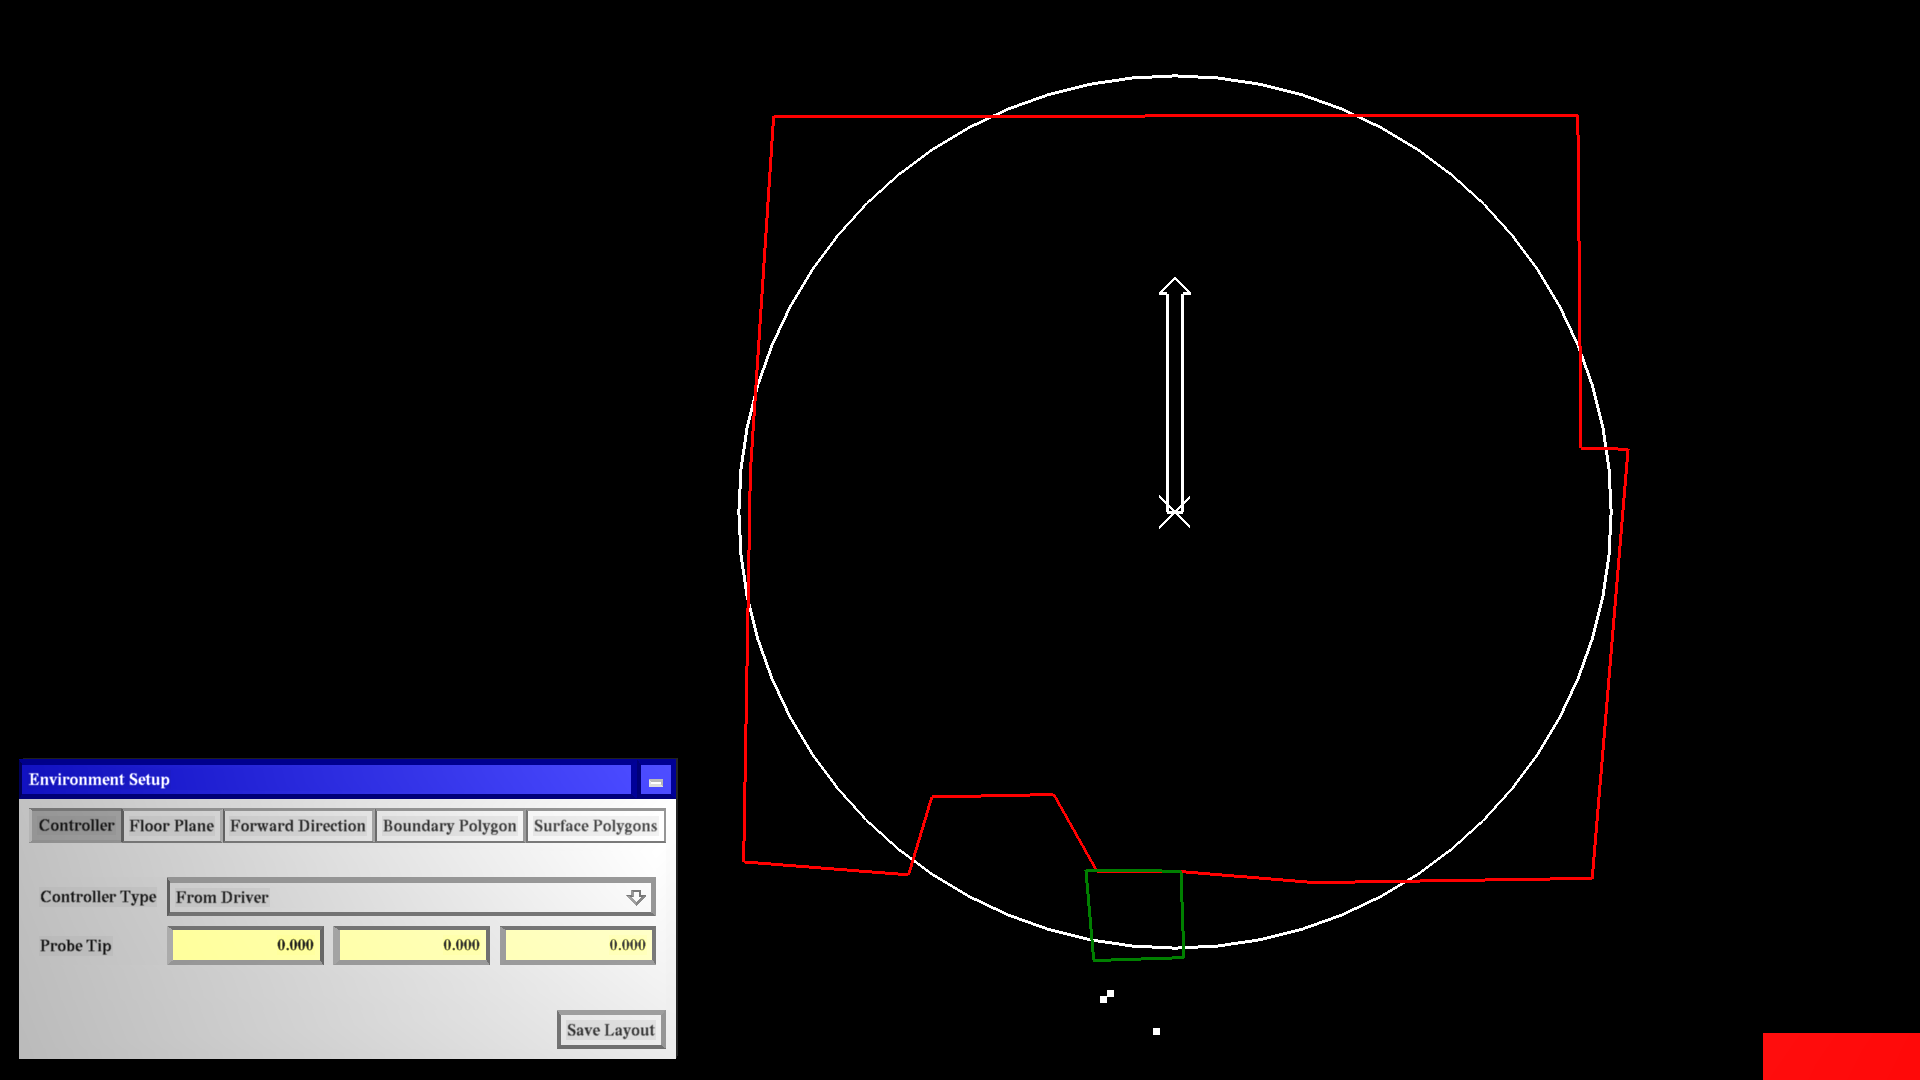
Figure 1: Vrui’s RoomSetup utility.
In order of use, the setup steps are:
- Controller: Check that “Controller Type” is set to “From Driver,” and that the “Probe Tip” fields are set to 0.0, 0.0, 0.0.
- Floor Plane: Set your workspace’s center position and floor elevation. Click the “Reset” button, then lay one controller down onto the floor, in the center of your workspace, with the trigger button facing down, and press any button on that controller.
- Forward Direction: Point one controller in the direction you will generally be facing, and press any button on that controller.
- Boundary Polygon: Define the boundaries of your VR workspace. First press the “Reset” button, then touch each corner point of your workspace boundary in clockwise or counter-clockwise order with one controller, and press any button on that controller to add a vertex to the boundary polygon.
- Surface Polygons: Define horizontal surfaces, for example safe areas to lay down your controllers while in VR. Sketch out a polygon in the same way as during boundary polygon set-up, and close each polygon by clicking the “Close Surface” button.
- Save Configuration: Click the “Save Layout” button, and then close RoomSetup’s window.
RoomSetup is a Vrui application, run here in desktop mode. You can pan the workspace display by pressing and holding the “z” key and moving the mouse (without pressing any mouse buttons), and zoom in/out by rolling the mouse wheel. Should you get lost, you can press “Win+Home” to reset the view, or open the program’s main menu by pressing and holding the right mouse button, pointing at “Vrui System,” then at “View,” and finally at “Reset View.”
Running Vrui Applications in VR
At this point, Vrui is installed and configured, and now it’s time to start trying Vrui applications in VR mode. The build script you used to install Vrui also built Vrui’s example applications (including the spinning globe with which it greeted you), and you can try any of those, or download and install specific applications you want to use such as LiDAR Viewer or 3D Visualizer. As it is sort of Vrui’s unofficial “Hello World,” let’s try the Earth viewer first. In a terminal window, run:
$ cd ~/src/Vrui-<major>.<minor>-<release>/ExamplePrograms
$ OnVive.sh ./bin/ShowEarthModel -norotate
The first command enters the directory containing Vrui’s example programs, inside Vrui’s source directory. Adjust Vrui’s directory name according to the version you downloaded.
The second command starts the Earth viewer. By default, Vrui applications start in “desktop mode,” where they pretend to be regular 3D graphics applications, controlled via keyboard and mouse. The easiest way to start Vrui applications in VR mode is to use the OnVive.sh script that is installed as part of Vrui. It will detect the Vive’s display, alert you if the display is not connected or not turned on, do other important housekeeping tasks, and finally start the given Vrui application in VR mode.
By default, OnVive.sh will not mirror the VR application’s 3D view to the main display, so you won’t see anything until you put on the headset. But once you do, you should see a globe in glorious 3D, sitting in the middle of your configured VR workspace. As you step close to your workspace’s boundaries, or reach out with a controller, you should see a green grid indicating your boundaries. Do not step or reach through those boundaries, or you might get hurt or damage your equipment!
As a first-time setup step, adjust the Vive’s lenses to match the distance between your eyes (your inter-pupillary distance, IPD). There is a small knob on the lower right of the headset; twisting that knob will move the left and right lenses closer together or farther apart. While you are twisting the knob, Vrui will show you the current distance between the two lenses’ centers in millimeters. Make sure this distance matches your IPD for the best experience. You can measure your IPD yourself ahead of time, using a mirror and a ruler.
This is also a good time to check for visual quality. In general, the visual quality of Vrui applications inside a Vive, in terms of lag, jitter, judder, distortion, chromatic aberration, etc., should be on par with native SteamVR applications. If it is not, it’s a serious problem that needs to be investigated. Unfortunately, there’s no step-by-step guide to troubleshoot those issues, but they appear to occur rarely. If they do, take to the comments.
When you’re done, place the controllers back onto their home spots using the horizontal polygon(s) you added during environment configuration as a guide, and take off the headset. To stop an application from the outside, move the mouse off the main display to the right (where the Vive’s display is mapped), click, and press the Esc key. Alternatively, if you did not move the mouse or click anywhere on the desktop since you started the current Vrui application, its window will still have the input focus, and you can just press the Esc key immediately. See the next section on how to shut down a Vrui application while still in VR.
If you want to see a secondary view of your virtual environment on the main display, add “-mergeConfig ControlWindow” to the command line of any Vrui application, like this:
OnVive.sh ./bin/ShowEarthModel -norotate -mergeConfig ControlWindow
-mergeConfig tells Vrui to load an additional configuration file, in this case /usr/local/etc/Vrui-4.6/ControlWindow.cfg, into its configuration space. That configuration file instructs Vrui to create a second virtual camera, and open a secondary window showing that camera’s view on the main display. You can edit that configuration file to fine-tune the properties of that window:
$ sudo xed /usr/local/etc/Vrui-4.6/ControlWindow.cfg
Common Vrui User Interface
All Vrui applications share a common user interface, provided by the Vrui toolkit itself. The interface is a combination of direct actions mapped to controller buttons and/or analog axes, and indirect actions represented by and accessed through traditional-looking “2.5D” GUI widgets (menus, dialogs, etc.).
Navigation
In Vrui parlance, “navigation” is the process of changing the mapping of an application’s internal 3D space (“navigational space”) into the real space of your VR workspace (“physical space”). For example, in its own navigational space, the Earth viewer represents the Earth at its actual size, meaning with a diameter of about 12,700 km, and with the Earth’s center at position (0, 0, 0). It only appears beachball-sized and in the middle of your VR workspace because Vrui transforms from navigational space to physical space by scaling such that 12,700 km fits into the workspace’s configured size, and translating such that (0, 0, 0) is mapped to the workspace’s configured center point. Navigation is the equivalent of how movement through virtual 3D environments is programmed in standard 3D graphics applications or 3D games; the main difference is that Vrui’s navigation model gives a lot more freedom.
By default, Vrui offers a general navigation interface to change this mapping from navigational space to physical space by applying arbitrary transformations, rotations, and uniform scales. In concrete terms, this means Vrui lets you move, rotate, and scale the “globe” arbitrarily.
The default navigation interface in Vive mode is mapped to the grip buttons on the left and right Vive controllers. Pressing the button on one controller will attach navigational space to that controller, meaning that any subsequent translation or rotation of that controller will translate and rotate navigational space in the same way. In simple terms, this means that you can “pick up” any virtual object, and move it around exactly as if it were a real object.
The two controllers are interchangeable in this regard; it does not make a difference which one you use to grab. You can pass objects from one hand to the other by grabbing with one hand, and then releasing and grabbing with the other. However, if you press the grip buttons on both controllers at the same time, you enter a secondary navigation mode. In this one, the two points you grabbed (one with either controller) stay attached to their respective controllers, and the object moves and changes scale accordingly. Concretely, if you grab two points and pull the controllers apart, the virtual object will become larger; if you grab and then push the controllers together, the virtual object will become smaller.
There is an important caveat: In this default two-handed interface, objects are scaled around the point you grabbed with the first controller. If you touch the surface of an object or reach inside an object and then grab, scaling will work as you expect: the object will grow or shrink around your hand. If, on the other hand, you first grab a point outside of an object, the object will still grow or shrink around your hand, but now your hand will be outside the object. This means that, if you zoom in, the object will move away from your hand, and will increase size at the same rate as it will move away. Together, these effects mean that the object will not really appear to grow.
As we cannot scale objects in the real world, and therefore have no intuition for how this should work, this is something to look out for until you get used to it. The best advice is: reach inside a virtual object before scaling, and if an object appears not to get any bigger when you scale, shrink it first until it is very small and directly in your hand, then grab inside it, and make it bigger again.
Vrui offers additional means of navigating that are more constrained than this general interface — for example, there is an interface that locks your real feet to a virtual surface and does not let you flip the world upside down, replicating the experience of typical navigation in a 3D game — but those are topics for more in-depth guides.
GUI Interaction
To bring up an application’s main menu, press and hold the “menu” button — the one above the touchpad — on either of the controllers. The menu will pop up a short distance in front of your hand, in a position to make quick selections via a laser pointer metaphor. To select a menu entry, point at it with the controller, and release the menu button.
By the way, should you ever get lost during navigation, you can reset the mapping from navigational space to physical space by selecting “Vrui System” -> “View” -> “Reset View.” And to exit a VR application while inside VR, select “Vrui System” -> “Quit Program.”
Vrui also uses persistent UI windows, equivalent to dialog windows in desktop GUIs, that can be positioned arbitrarily in 3D space. To open such a window, bring up the main menu, point down at the “Vrui System” entry, then move to the right into the sub-menu that pops up, point at “View,” and in that sub-menu point at “Load View…” and let go of the menu button. This will pop up a file selection dialog right in front of your hand. Use the same menu button to interact with components of that dialog, as you would in a desktop GUI using the left mouse button. To move the dialog window, point at the title bar, press and hold the menu button, and move the controller. Some dialog windows allow you to adjust their size by grabbing and pulling the window’s border with the menu button. You can hide most dialog windows by selecting the “-” icon in the top right corner, and some dialog windows can be closed permanently by selecting the “x” icon in the top right corner. To get back a hidden dialog window, open the main menu, and navigate to “Vrui System” -> “Dialogs”, which will list all open dialogs. If you select one that was hidden, it will re-appear at its last position; if you select one that was already visible, it will snap to a position directly in front of your hand.
Unused Buttons and Dynamic Tool Assignment
Initially, only the grip and menu buttons on the controllers have functions associated with them (two-handed navigation and menu / GUI interaction, respectively). All other buttons are unassigned. In Vrui, you can dynamically assign toolkit- or application-provided functionality to any unassigned buttons, and remove those assignments again when you no longer need them.
To assign a function to an open button, press and hold that button. This will open a “tool selection menu” right in front of the controller, which lists all available functions. Many of those are toolkit-provided and shared by all applications, while some are application-specific.
To test tool assignment, press and hold the trigger button on one of your controllers, and select “Clipping Plane” from the “Pointer” sub-menu. This will assign a clipping plane tool to the trigger button. To test it, press and hold the trigger button and reach into the globe. You will see that the part of the globe that is behind your hand will be cut away.
To delete a tool that you no longer need, move the controller to which the tool is bound to the right of your head, about 10″ to the right of your right ear. That is the position of the “tool trash can,” where you can drop tools. With the controller inside the trash can (it might take a bit of practice to find it), press and hold the trigger button, and move the controller back to where you can see it. You will notice a label floating above the controller that tells you the type of tool bound to the button you are currently holding, and the specific function assigned to that button. In this case, it should say “Clipping Plane” and “Point.” To delete a tool instead of seeing its name and function, move the controller inside the tool trash can, press the button you want to clear, and release it while still inside the tool trash can.
Next Steps
There is more to try there are more guides to write, but this covers the basics of setting up Vrui and running Vrui applications. Try it, have fun, and let me know how it goes in the comments below!

Hey Oliver—any word on how Vrui works with the Oculus Rift? I’ve been wanting to play with Vrui for ages, but I unfortunately don’t have a Vive.
(I also don’t have a VR-capable Linux desktop, but I’ve half a mind to try with Ubuntu running under Windows Subsystem for Linux. Just because I like to make my hobby projects more difficult than they need to be. 😉
Unfortunately, Vrui and Oculus Rift have no overlap. Vrui runs on most operating systems except Windows (and mobiles), and Oculus Rift runs only on Windows.
Re Windows Subsystem for Linux: I’m not sure what the status of 3D graphics on that is. Last time I checked, the consensus was that it either doesn’t support graphics at all, or only through a software emulation layer that makes it unusable for anything interactive, let alone VR.
Shoot! Well, I’ll have to admire it in the abstract for the time being.
Digging a little, it looks like WSL doesn’t currently support graphics natively, although you can run a Windows-native X server for X applications. 3D wise it looks like nothing is there yet (except probably Mesa I suppose, which hardly counts), but there’s active interest on the part of the WSL team to change that: https://twitter.com/tara_msft/status/1065325937212964864
It borked:
make STEAMVRDIR=/opt/Games/Steam/SteamApps/common/SteamVR
[…]
OpenVR SDK or SteamVR run-time do not exist on host system; support for HTC Vive disabled
And yes that’s the SteamVR directory. Might it be too modern?
What do you get from
ls -l /opt/Games/Steam/SteamApps/common/SteamVR/drivers/lighthouse/bin/linux64?
Vrui-6.0-001 supports SteamVR up to version 1.9.17, but unfortunately it crashes with 1.10.32 due to an unknown incompatibility.
4058479 Jun 16 11:26 driver_lighthouse.so
164291 Mai 18 20:15 libaitcamlib.so
And yes, I do have the newest beta of SteamVR in use.. 1.13.3