KeckCAVES on Mars, pt. 2

I’ve already mentioned KeckCAVES‘ involvement in NASA‘s newest Mars mission, the Mars Science Laboratoryin a previous post, but now I have an update. Dawn Sumner, UC Davis‘ member of the Curiosity science team, was interviewed last week for “Onward California,” which I guess is some new system-wide outreach and public relations effort to get the public’s mind off last fall’s “unpleasantries.” Just kidding UC, you know I love you.

Anyway… Dawn decided that the best way to talk about her work on Mars would be to do the interview in the CAVE, showing how our software, particularly Crusta Mars, was used during the planning stages of the mission, specifically landing site selection. I then suggested that it would be really nice to do part of the interview about the rover itself, using a life-size and high-resolution 3D model of the rover. So Dawn went to her contacts at the Jet Propulsion Laboratory, and managed to get us a very detailed 3D model, made of several million polygons and high-resolution textures, to load into the CAVE.

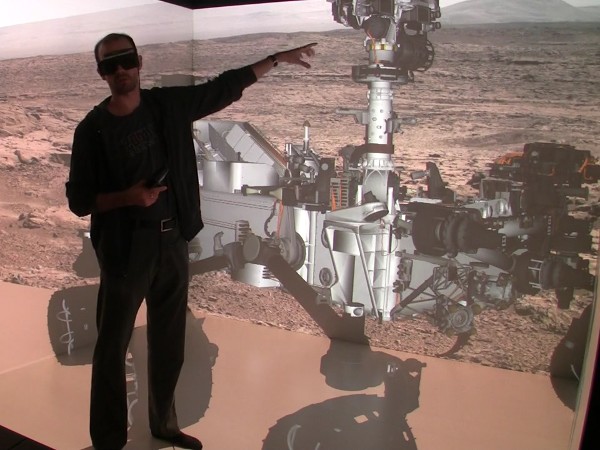
What someone posing with a life-size 3D model of the Mars Curiosity rover might look like.

As it so happens, I have a 3D mesh viewer that was able to load and render the model (which came in Alias|Wavefront OBJ format), with some missing features, specifically no specularity and bump mapping. The renderer is fast enough to draw the full, undecimated mesh at sufficient frame rate for immersive display, around 30 frames per second.

The next problem, then, was how to film the beautiful rover model in the CAVE without making it look like garbage, another topic about which I’ve posted before. The film team, from the Department of the 4th Dimension, fortunately was on board, and filmed the interview in several segments, using hand-held and static camera setups.

We have pretty much figured out how to film hand-held video using a secondary head tracker attached to the camera, but static setups where the camera is outside the CAVE, and hence outside the tracking system’s range, always take a lot of trial and error to set up. For good video quality, one has to precisely measure the 3D position of the camera lens relative to the CAVE and then configure that in the CAVE software.

Previously, I used to do that by guesstimating the camera position, entering the values into the configuration file, and then using a Vrui calibration utility to visually judge the setup’s correctness. This involves looking at the image and why it’s wrong, mentally changing the camera position to correct for the wrongness, editing the configuration file, and repeating the whole process until it looks OK. Quite annoying that, especially if there’s an entire film crew sitting in the room checking their watches and rolling their eyes.

After that filming session, I figured that Vrui could use a more interactive way of setting up CAVE filming, a user interface to set up and configure several different filming modes without having to leave a running application. So I added a “filming support” vislet, and to properly test it, filmed myself posing and playing with the Curiosity rover (MSL Design Courtesy NASA/JPL-Caltech):

Pay particular attention to the edges and corners of the CAVE, and how the image of the 3D model and the image backdrop seamlessly span the three visible CAVE screens (left, back, floor). That’s what a properly set up CAVE video is supposed to look like. Also note that I set up the right CAVE wall to be rendered for my own point of view, in stereo, so that I could properly interact with the 3D model and knew what I was pointing at. Without such a split-CAVE setup, it’s very hard to use the CAVE when in filming mode.

The filming support vislet supports head-tracked recording, static recording, split-CAVE recording (where some screens are rendered for the user, and some for the camera), setting up custom light sources, and a draggable calibration grid and input device markers to simplify calibrating a static camera setup when the camera is outside the tracking system’s range and cannot be measured directly.

All in all, it works quite well, and is a significant improvement over the previous setup method. It is now possible to change filming modes and camera setups from within a running application, without having to exit, edit configuration files, and restart.

Build your own professional-grade holographic display

I started working on low-cost VR, that is, cheap (at least compared to a CAVE or other high-end system) professional-grade holographic display systems about 4 1/2 years ago, after seeing one at the 2008 IEEE VR conference. It consisted of a first generation DLP-based projection 3D TV and a NaturalPoint OptiTrack optical tracking system. I put together my own in Summer 2008, and have been building, or helped others building, more at a steadily increasing rate — one in my lab, one in our med school, one at UC Berkeley, one at UC Merced, one at UC Santa Barbara, a handful more at NASA labs all over the country, and probably some I don’t even know about. Here’s a video showing me using one to explore a CAT scan of a patient with a nasty head fracture:

Back then, I created a new subsite of my web site dedicated to low-cost VR, with a detailed shopping list and detailed installation and configuration instructions. However, I did not update either one for a long time after, leading to a very outdated shopping list and installation instructions that were increasingly divergent from state-of-the-art approaches.

But that has changed recently. As part of an NSF-funded project on paleoceanography, we promised to install two such systems at our partner institutions, University of California, Santa Barbara, and Woods Hole Oceanographic Institution. I installed the first one a couple of months ago. Then, I currently have two exchange students from the University of Georgia (this Georgia, not that Georgia) who came here to learn how to build these systems in order to build one for their department at home. To train them, I rebuilt my own system from scratch, let them take the lead on rebuilding the one at our medical school, and right now they’re on the east coast to install the new system at WHOI.

Observing “newbies” following my guide trying to build a system from scratch allowed me to significantly improve the instructions, to the point that I believe they’re now comprehensive and can be followed by first-time builders with some computing knowledge. I also updated the shopping list to again represent a currently-available system, with current prices.

So the bottom line is that I now feel comfortable to let people go wild with the low-cost VR subsite and build their own display systems. If no existing equipment (computers, 3D TVs, …) can be used, a very nice, large (65″ TV), and powerful system can be built for around $7000, depending on daily deals. While not exactly cheap-cheap, one has to keep in mind that this is a professional-grade system, fit for scientific and other serious uses.

I should mention that we have an even lower-cost design, replacing the $3500 optical tracking system with a $150 Razer Hydra controller, but there’s a noticeable difference in functionality between the two. I should also mention that there’s a competing design, the IQ Station, but I believe that ours is better (and I’m not biased at all!).

KeckCAVES on Mars

You might have heard that NASA has a new rover on Mars. What you might not know is that KeckCAVES is quite involved with that mission. One of KeckCAVES’ core scientists, Dawn Sumner, is a member of the Curiosity Science Team. Dawn talks about her experiences as tactical long term planner for the rover’s science mission, and co-investigator on several of the rover’s cameras, on her blog, Dawn on Mars.

Immersive 3D visualization has been used at several stages of mission planning and preparation, including selection of the rover’s landing site. Crusta, the virtual globe software developed by KeckCAVES, was used to create a high-resolution global topography model of Mars, merging the best-quality data available for the entire planet and each of the originally proposed landing sites. Crusta’s ability to run in an immersive 3D display environment such as KeckCAVES’ CAVE, allowing users to virtually walk on the surface of Mars at 1:1 (or any other) scale, and to create maps by drawing directly on the 3D surface, was important in weighing the relative merits of the four proposed sites from engineering and scientific viewpoints.

Dawn made the following video after Gale Crater, her preferred landing site, had been selected for the mission to illustrate her rationale. The video is stereoscopic and can be viewed using red/blue anaglyphic glasses or several other stereo viewing methods:

We filmed this video entirely virtually. Dawn is working with Crusta on a low-cost immersive 3D environment based on a 3D TV, which means she perceived Crusta’s Mars model as a tangible 3D object and was able to interact with it via natural gestures using an optically-tracked Nintendo Wii controller as input device, and point out features of interest on the surface using her fingers. Dawn herself was filmed by two Kinect 3D video cameras, and the combination of virtual Mars and virtual Dawn was rendered into a stereo movie file in real-time while she was working with the software.

Now that Curiosity is on Mars, we are planning to continue using Crusta to visualize and evaluate its progress, and we hope that Crusta will soon help planning and executing the rover’s journey up Mt. Sharp (NASA have their own 3D path planning software, but we believe Crusta has useful complementary features).

Furthermore, as the rover progresses, it will send high-resolution stereo images from its mast-mounted navigation camera. Several KeckCAVES developers are working on software to convert these stereo images into ultra-high resolution digital terrain models, and to register these to, and integrate them with, Crusta’s existing Mars topography model as they become available.

We already tried this process with stereo imagery from the previous two Mars rovers, Spirit and Opportunity. We took the highest-resolution orbital topography data available, collected by the HiRISE camera, and merged it with the rover data, which is approximately 1000 times more dense. The following figure shows the result (click to embiggen):

The white arrow in panel A shows the location of the rover’s high-resolution data patch shown in panels B and C. In panel C, a stratum of rock — identified by its different color — was selected, and a plane was fit to the selected points (highlighted in green) to measure the stratum’s bedding angle.

The above images were created with LiDAR Viewer, another KeckCAVES software package. LiDAR Viewer is used to visually analyze very large 3D point clouds, such as those resulting from laser scanning surveys, or, in this case, orbital and terrestrial stereo imagery.

The terrain data we expect from Curiosity’s stereo cameras will be even higher resolution than that. The end result will be an integrated global Martian topography model with local patches down to millimeter resolution, allowing a scientist in the CAVE to virtually pick up individual pebbles.

Whither Leap Motion?

Leap Motion‘s Leap, an optical tracking system enabling using one’s hands directly to interact with computers in three dimensions, has been the talk of the town recently. So what’s my take on it, and particularly its use for immersive graphics?

Cool story, bro. Two months ago, a group of researchers from UC Davis and I visited the company in their San Francisco offices to see the device for ourselves. Several of Leap Motion’s engineers had seen our booth at the recent Bay Area Maker Faire, and invited us to bring one of our low-cost semi-immersive displays (a 3D TV with a Razer Hydra 6-DOF input device) and show our stuff. We obliged, packed our things, and down along I-80 to SF we went. We showed them ours, they showed us theirs, and fun was had by all.

So what’s the intelligence gathered from this visit? There’s good news, and there’s bad news. The good news is the hardware. Leap Motion have been touting the Leap as a much more precise alternative to the Kinect, and they have that absolutely right. The precision, resolution, and responsiveness of the device are exactly what they claim. Interestingly, I did not glean that insight from the actual software demos they were showing, but from a very simple utility that just showed the raw 3D point cloud of everything that entered the device’s capture space, and identified hands, fingers, and other gadgets such as pencils accurately and in real time. Having done extensive work with the Kinect, I can say that it’s an entirely different kind of tracking, altogether.

So what’s the bad news? Well, as usual, it’s the software and application side. Leap Motion’s company line is that the Leap will make mouse and keyboard obsolete. Not so fast there, buckaroo. Probably 99.99% of computer interactions done by normal people are two-dimensional in nature, and the mouse/keyboard are really good at those. You would not want to use a free-space 3D interface for intrinsically 2D interactions, which is, incidentally, my only gripe with the famous Minority Report interface (but that’s a topic for another post). The end result from doing that already has a fitting name: “Gorilla Arm.” I think I can speak to that because that’s exactly what happens when you’re doing 2D tasks (like using a web browser or filling in a spreadsheet) in an immersive display environment. Trust me, it’s not something you want to do if you can avoid it.

On the other hand, if you’re one of the minority of people who use their computers for 3D tasks, e.g., 3D modeling, sculpting, or, naturally, immersive 3D graphics, it’s an entirely different story. For such applications in the desktop realm, the Leap is a godsend. Instead of having to do the mental gymnastics of using a 2D input device to perform 3D interactions, you just interact directly with the 3D data. This is, again, exactly what’s happening in immersive graphics, and yes, it’s something you definitely do want to do.

So that’s good news, right? Well, yeah, but… The problem here is, and it’s a big problem, that in order to pipe 3D interactions captured by a device like the Leap into a 3D application, you have to punch through the existing 2D-based user interface of that application. The previous approach companies developing novel 3D input devices (think all the data gloves, 3D mice, etc. that have come out and failed over the years) have taken is to provide some form of mouse emulation, so that their devices can be used immediately with existing software. This does not work, ever. In this setup, 3D interactions performed with the device are first boiled down to 2D by the device’s driver, fed into the application, and then turned back into 3D interactions using whatever interface paradigm the application is using. The first step, going from 3D to 2D, is already awkward, and the second step is typically optimized for particular 2D devices, such as mice, which a “simulated” mouse device is most decidedly not. In other words, there are two levels of ill-fitting interface paradigms stacked on top of each other.

So what needs to be done? The answer is quite simple: if you want to effectively use the Leap with a piece of 3D software, that software has to explicitly support the Leap, and needs to use appropriate direct 3D interaction metaphors. Meaning the application developers have to buy into the Leap, dream up good problem-specific 3D interaction metaphors, do studies or experiments to fine-tune them, and then include them in their software. That takes a lot of time and money, and they won’t do it unless there is high demand, i.e., the Leap is already a widely-used device. But it won’t become a widely-used device unless a lot of widely-used 3D software already supports it in an effective way.

So it’s a classical chicken-and-egg problem. Unless you happen to use a certain VR development toolkit that is based around exactly this idea: providing device-optimized 3D interaction metaphors outside of an application’s purview, so that hardware developers can integrate their devices into existing applications without having to change those applications in any way, or even getting to their source code. But I digress…

Back on topic, what Leap Motion need to do is find at least one “killer application,” and do their utmost to get that application just exactly right. And then they have to bundle that application with every device sold. If the people buying their device are stuck with playing Fruit Ninja, or navigating with Google Earth (another thing a mouse is really good at, because Google successfully boiled down the interaction to 2D, and Leap’s Google Earth plug-in doesn’t add any new functionality) or have to use the device to write emails, they won’t recommend it to their friends.

By the way: will the Leap work out-of-the box for 3D video games? Hard to say, but I’m skeptical. They show a “finger gun” control scheme for first-person shooters — again implemented via mouse emulation — but doing that for more than a few minutes will lead to a very sore shoulder. Not that it’s a bad idea in itself — see below for a video showing exactly that interface in a CAVE — but unless the Leap is integrated into a fully calibrated desktop system, it won’t allow a player to actually aim with the “finger gun;” it will be just an equally indirect replacement for moving the mouse left-to-right.

On their web site, Leap Motion mention CAD and clay modeling as applications that inspired them to develop it. Could these be killer applications? Time will tell, but it’s at least a good starting point. So, go ahead and do it! I happen to have a 3D virtual clay modeling application with direct 3D interaction metaphors lying around, just saying…

Now, to restate my overall point after all this skepticism. From what I’ve personally seen, the Leap is an awesome device. I will definitely buy at least one when it comes out. That’s because all the software I’m developing and using on a daily basis is already poised to work with it, due to its input abstraction paradigm. Give me a low-level driver, and the rest is gravy — please, give me a low-level driver! But will the device succeed in the mainstream market, given the issues discussed here? Will it sell hundreds of millions of units, as they hope? For that to happen, I think, they’ll have to do significantly more than what they showed us. Maybe that’s why they pushed back the release date by half a year — here’s hoping.