So it appears the Oculus Rift is really happening. A buddy of mine went in early on the kickstarter, and his will supposedly be in the mail some time this week. In a way the Oculus Rift, or, more precisely, the most recent foray of VR into the mainstream that it embodies, was the reason why I started this blog in the first place. I’m very much looking forward to it (more on that below), but I’m also somewhat worried that the huge level of pre-release excitement in the gaming world might turn into a backlash against VR in general. So I made a video laying out my opinions (see Figure 1, or the embedded video below).
Figure 1: Still from a video describing how head-mounted displays should be used to create convincing virtual worlds.
This article is related to VR in two ways. First, the usual progression of overhyping the capabilities of some new technology and then falling flat on one’s face because not even one’s own developers know what the new technology’s capabilities actually are is something that should be very familiar to anyone working in the VR field.
But here’s the quote that really got my interest (emphasis is mine):
Others recall worrying about the presentation not being live, and thinking people might assume it was fake. Milo worked well, they say, but filming someone playing produced an optical illusion where it looked like Milo was staring at the audience rather than the player. So for the presentation, the team hired an actress to record a version of the sequence that would look normal on camera, then had her pretend to play along with the recording. … “We brought [Claire] in fairly late, probably in the last two or three weeks before E3, because we couldn’t get it to [look right]” says a Milo team member. “And we said, ‘We can’t do this. We’re gonna have to make a video.’ So she acted to a video. “Was that obvious to you?” Following Molyneux’s presentation, fans picked apart the video, noting that it looked fake in certain places.
Gee, sounds familiar? This is, of course, the exact problem posed by filming a holographic display, and a person inside interacting with it. In a holographic display, the images on the screens are generated for the precise point of view of the person using it, not the camera. This means it looks wrong when filmed straight up. If, on the other hand, it’s filmed so it looks right on camera, then the person inside will have a very hard time using it properly. Catch 22.
With the “Milo” demo, the problem was similar. Because the game was set up to interact with whoever was watching it, it ended up interacting with the camera, so to speak, instead of with the player. Now, if the Milo software had been set up with the level of flexibility of proper VR software, it would have been an easy fix to adapt the character’s gaze direction etc. to a filming setting, but since game software in the past never had to deal with this kind of non-rigid environment, it typically ends up fully vertically integrated, and making this tiny change would probably have taken months of work (that’s kind of what I meant when I said “not even one’s own developers know what the new technology’s capabilities actually are” above). Am I saying that Milo failed because of the demo video? No. But I don’t think it helped, either.
The take-home message here is that mainstream games are slowly converging towards approaches that have been embodied in proper VR software for a long time now, without really noticing it, and are repeating old mistakes. The Oculus Rift will really bring that out front and center. And I am really hoping it won’t fall flat on its face simply because software developers didn’t do their homework.
I went to the Sacramento Hacker Lab last night, to see a presentation by Intel about their soon-to-be-released “perceptual computing” hardware and software. Basically, this is Intel’s answer to the Kinect: a combined color and depth camera with noise- and echo-cancelling microphones, and an integrated SDK giving access to derived head tracking, finger tracking, and voice recording data.
Figure 1: What perceptual computing might look like at some point in the future, according to the overactive imaginations of Intel marketing people. Original image name: “Security Force Field.jpg” Oh, sure.
Now here’s some good news: I mentioned recently that reports of VR’s death are greatly exaggerated, and now I am happy to announce that researchers with the Institute of Cybernetics at Tallinn University of Technology have constructed the country’s first immersive display system, and I’m prowd to say it’s powered by the Vrui toolkit. The three-screen, back-projected display was entirely designed and built in-house. Its main designers, PhD student Emiliano Pastorelli and his advisor Heiko Herrmann, kindly sent several diagrams and pictures, see Figures 1, 2, 3, and 4.
Figure 1: Engineering diagram of Tallinn University of Technology’s new VR display, provided by Emiliano Pastorelli.
I’ve talked about “holographic displays” a lot, most recently in my analysis of the upcoming zSpace display. What I haven’t talked about is how exactly such holographic displays work, what makes them “holographic” as opposed to just stereoscopic, and why that is a big deal.
Teaser: A user interacting with a virtual object inside a holographic display.
Figure 1: A marketing image for the zSpace holographic display. Image taken from http://zspace.com.
I’ve been waiting for this for such a long time: a turn-key stereoscopic display with built-in pre-calibrated head tracking and tracked input device. We’ve been in the low-cost VR business for more than four years now, but the biggest problem is that our reference design is entirely DIY. Users have to go out and buy individual components, assemble them, and then — most importantly — calibrate them with respect to each other. This calibration step is the biggest hurdle for low-cost VR’s acceptance, because the idea behind it is somewhat hard to understand for VR non-experts, and even if it’s understood, it still requires expensive non-standard tools.
The solution, of course, is simple: instead of having the display and tracking system as separate entities that need to be calibrated with respect to each other, integrate them into the same frame, and pre-calibrate them at the factory. The only thing that had to happen was for a manufacturer to step up to the plate and make it so.
What I haven’t mentioned before is that we have an even lower-cost, and, more importantly, easier to install, alternative using just a 3D TV and a Razer Hydra gaming input device. These environments are not holographic because they don’t have head tracking, but they are still very usable for a large variety of 3D applications. We have several of these systems in production use, and demonstrated them to the public twice, in our booth at the 2011 and 2012 AGU fall meetings. What we found there is that the environments are very easy to use; random visitors walking into our booth and picking up the controllers were able to control fairly complex software in a matter of minutes.
A user controlling a low-cost 3D display (running the Nanotech Construction Kit) with a Razer Hydra 6-DOF tracked input device.
I’ve already mentioned KeckCAVES‘ involvement in NASA‘s newest Mars mission, the Mars Science Laboratory, in a previous post, but now I have an update. Dawn Sumner, UC Davis‘ member of the Curiosity science team, was interviewed last week for “Onward California,” which I guess is some new system-wide outreach and public relations effort to get the public’s mind off last fall’s “unpleasantries.” Just kidding UC, you know I love you.
Anyway… Dawn decided that the best way to talk about her work on Mars would be to do the interview in the CAVE, showing how our software, particularly Crusta Mars, was used during the planning stages of the mission, specifically landing site selection. I then suggested that it would be really nice to do part of the interview about the rover itself, using a life-size and high-resolution 3D model of the rover. So Dawn went to her contacts at the Jet Propulsion Laboratory, and managed to get us a very detailed 3D model, made of several million polygons and high-resolution textures, to load into the CAVE.
What someone posing with a life-size 3D model of the Mars Curiosity rover might look like.
As it so happens, I have a 3D mesh viewer that was able to load and render the model (which came in Alias|Wavefront OBJ format), with some missing features, specifically no specularity and bump mapping. The renderer is fast enough to draw the full, undecimated mesh at sufficient frame rate for immersive display, around 30 frames per second.
The next problem, then, was how to film the beautiful rover model in the CAVE without making it look like garbage, another topic about which I’ve posted before. The film team, from the Department of the 4th Dimension, fortunately was on board, and filmed the interview in several segments, using hand-held and static camera setups.
We have pretty much figured out how to film hand-held video using a secondary head tracker attached to the camera, but static setups where the camera is outside the CAVE, and hence outside the tracking system’s range, always take a lot of trial and error to set up. For good video quality, one has to precisely measure the 3D position of the camera lens relative to the CAVE and then configure that in the CAVE software.
Previously, I used to do that by guesstimating the camera position, entering the values into the configuration file, and then using a Vrui calibration utility to visually judge the setup’s correctness. This involves looking at the image and why it’s wrong, mentally changing the camera position to correct for the wrongness, editing the configuration file, and repeating the whole process until it looks OK. Quite annoying that, especially if there’s an entire film crew sitting in the room checking their watches and rolling their eyes.
After that filming session, I figured that Vrui could use a more interactive way of setting up CAVE filming, a user interface to set up and configure several different filming modes without having to leave a running application. So I added a “filming support” vislet, and to properly test it, filmed myself posing and playing with the Curiosity rover (MSL Design Courtesy NASA/JPL-Caltech):
Pay particular attention to the edges and corners of the CAVE, and how the image of the 3D model and the image backdrop seamlessly span the three visible CAVE screens (left, back, floor). That’s what a properly set up CAVE video is supposed to look like. Also note that I set up the right CAVE wall to be rendered for my own point of view, in stereo, so that I could properly interact with the 3D model and knew what I was pointing at. Without such a split-CAVE setup, it’s very hard to use the CAVE when in filming mode.
The filming support vislet supports head-tracked recording, static recording, split-CAVE recording (where some screens are rendered for the user, and some for the camera), setting up custom light sources, and a draggable calibration grid and input device markers to simplify calibrating a static camera setup when the camera is outside the tracking system’s range and cannot be measured directly.
All in all, it works quite well, and is a significant improvement over the previous setup method. It is now possible to change filming modes and camera setups from within a running application, without having to exit, edit configuration files, and restart.
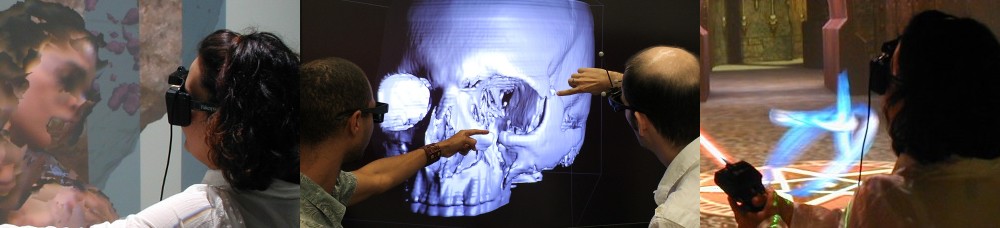
I started working on low-cost VR, that is, cheap (at least compared to a CAVE or other high-end system) professional-grade holographic display systems about 4 1/2 years ago, after seeing one at the 2008 IEEE VR conference. It consisted of a first generation DLP-based projection 3D TV and a NaturalPointOptiTrack optical tracking system. I put together my own in Summer 2008, and have been building, or helped others building, more at a steadily increasing rate — one in my lab, one in our med school, one at UC Berkeley, one at UC Merced, one at UC Santa Barbara, a handful more at NASA labs all over the country, and probably some I don’t even know about. Here’s a video showing me using one to explore a CAT scan of a patient with a nasty head fracture:
Back then, I created a new subsite of my web site dedicated to low-cost VR, with a detailed shopping list and detailed installation and configuration instructions. However, I did not update either one for a long time after, leading to a very outdated shopping list and installation instructions that were increasingly divergent from state-of-the-art approaches.
But that has changed recently. As part of an NSF-funded project on paleoceanography, we promised to install two such systems at our partner institutions, University of California, Santa Barbara, and Woods Hole Oceanographic Institution. I installed the first one a couple of months ago. Then, I currently have two exchange students from the University of Georgia (this Georgia, not that Georgia) who came here to learn how to build these systems in order to build one for their department at home. To train them, I rebuilt my own system from scratch, let them take the lead on rebuilding the one at our medical school, and right now they’re on the east coast to install the new system at WHOI.
Observing “newbies” following my guide trying to build a system from scratch allowed me to significantly improve the instructions, to the point that I believe they’re now comprehensive and can be followed by first-time builders with some computing knowledge. I also updated the shopping list to again represent a currently-available system, with current prices.
So the bottom line is that I now feel comfortable to let people go wild with the low-cost VR subsite and build their own display systems. If no existing equipment (computers, 3D TVs, …) can be used, a very nice, large (65″ TV), and powerful system can be built for around $7000, depending on daily deals. While not exactly cheap-cheap, one has to keep in mind that this is a professional-grade system, fit for scientific and other serious uses.
I should mention that we have an even lower-cost design, replacing the $3500 optical tracking system with a $150 Razer Hydra controller, but there’s a noticeable difference in functionality between the two. I should also mention that there’s a competing design, the IQ Station, but I believe that ours is better (and I’m not biased at all!).
I don’t think there’s need to introduce the Oculus Rift HMD. Everyone’s heard of it, and everyone’s psyched – including me.
However, HMDs are prone to certain issues, and while that shouldn’t detract us from embracing them, we should be careful to do it right this time. The last thing the VR field needs right now is a viral YouTube video along the lines of “Oh, an Oculus Rift! Cool! Let me try it on… Wow, that’s awesoBLEEAAARRGHHH.”
To back up a little: when HMDs became a thing in the 80s, they tended to induce dizziness and nausea in viewers, after a relatively short time of using them. Interestingly, HMDs had generally worse effects than other types of immersive display environments such as CAVEs. The basic theory of simulation sickness is based on virtual motion, and does not account for this difference.
The commonly stated explanation for this difference is display lag. In an HMD, the screens move with the viewer’s head, and any delay will cause the virtual world to move along with the viewer until the display system catches up. Imagine wearing an HMD and quickly turning your head to the side. Say it takes 30ms total until this motion is noticed by the head tracking system, the application updates its internal state, renders the new state, and refreshes the HMD’s screens. During this interval, the world will turn with you, and it will snap back to its original orientation once the delay time has passed. The real world does not behave like that, and because HMD-based graphics tap deeply into our brain’s visual system, this is very disorienting and adds to the discomfort. In a CAVE, on the other hand, the screens do not move with the viewer. Delay will still cause a disturbance in the projection of the virtual world, as the actual viewer position will not match the virtual one, but because screens are large and relatively far away, this will be barely noticeable. So far, so good.
Alas, there is an additional, often overlooked, factor — display calibration. Any immersive graphics system, HMD or CAVE or else, needs to exactly replicate how virtual objects are projected onto the system’s real screens, and then seen by the user (how exactly that works is a topic for another post). The bottom line is that the graphics software needs to know the absolute positions and orientations of all screens, and the absolute positions of the viewer’s eyes. Determining this is the job of head tracking and system calibration. But in an HMD, unlike in a CAVE, the tolerances for calibration are very low. The screens are very small and very close to the viewer’s eyes, which doesn’t leave much room for error (see Figure 1). Even worse, there is no way to precisely don an HMD short of putting screws into one’s skull; every time you put it on, it sits slightly differently. And that means any pre-configured projection parameters will not match reality.
Figure 1: Diagram of a hypothetical HMD for calibration purposes. The HMD consists of small real screen mounted directly in front of the viewer’s eyes, and uses optics to create larger virtual screens at a longer distance away to allow users to properly focus on those screens. For proper calibration, graphics software needs to know the precise positions of the viewer’s pupils and the exact positions and sizes of the virtual screens, in some coordinate system. Head tracking will provide the mapping from this viewer-attached coordinate system to the world coordinate system to allow users to look and walk around.
These mismatches have several effects. For one, imagine that a viewer wears an HMD slightly askew, so that the two screens have different vertical positions in front of their respective eyes. If the software does not account for that, the two stereo images will be vertically displaced, something that does not happen in real life. The viewer’s eyes will make up for it, up to a point, by moving up/down independently, but that is an unnatural motion and causes eye strain. It’s the same effect as watching a 3D movie in a theater while not holding one’s head level — it will hurt later.
Another, more subtle, effect is that in a miscalibrated display system the virtual world does not behave as the real world would. Do a simple experiment: fire up some first-person video game that allows view configuration, such as Doom3, and set a high field of view. Then rotate the view and observe. The virtual world will display a strong distortion effect, meaning that the sizes of objects, and their internal angles, change as the viewpoint changes. This is an extreme example, but even slight discrepancies are subconsciously unsettling, because our visual system is very good at detecting if something is not right with the world, and it tells us that by making us sick.
Even in non-immersive 3D graphics, a too large discrepancy between real field of view (how large the screen looms in our visual field) and programmatic field-of-view is known to cause motion sickness, and immersive 3D graphics with the same issue will be much worse. FOV discrepancy is only one symptom of miscalibration, but it’s the one that’s easiest to demonstrate; the others are more subtle (but that’s a topic for another post). In the end, miscalibration is a nasty problem because it is subtle, very hard to correct, and causes significant ill effects.
I noticed these things when I started experimenting with my own HMDs a while ago (I have an eMagin Z800 3DVisor and a Sony HMZ-T1). I experimented with rapid motions, but those didn’t really make me dizzy. I did notice, however, that the world didn’t seem solid, but as if it was made from jelly. I expected that, not having done proper calibration yet, so I used an interactive calibration utility to set up the system just so. After that, the world seemed stable, and interestingly I didn’t notice any more issues from lag. Not having done any further experiments, my hunch is that miscalibration is actually a bigger problem than lag. (Disclosure: while I was using a low-latency Intersense IS-900 tracking system, the computer running the show was fairly old, and the Quake3 renderer had no particular performance tweaking, so I estimated total system delay around 30ms).
So what’s the take-home message from this wall of text? If we want HMDs to succeed, we need to treat them properly in our graphics software. We need to use proper projection models instead of the standard camera model (but that’s a topic for another post), and not simply apply ad-hoc stereo models such as toe-in etc. (but that’s a topic for another post). It might work for a demo, but it won’t be pretty, and it will make our users sick. Instead, we need to know exactly how the HMD is laid out internally (screen placement and size, effects from the optical system in front of the screens, lens distortions, etc.), and, just as importantly, we need to know exactly where the viewer’s eyes are with respect to the screens (see Figure 1). This last one is the hard part. Maybe a future perfect HMD will contain one pair of stereo cameras per screen that will accurately track the viewer’s pupils and allow the graphics software to set up the projection parameters correctly, no matter how the HMD is worn and how the viewer moves. But until then, we need to come up with a practical approach, and we need to find simple methods to calibrate HMDs on the fly, and teach our users how to use those methods.
Well, and, of course, we mustn’t forget about minimizing lag, either. That would be too easy.
Oh, and by the way, want to get a quick glimpse of just how immersive the Oculus Rift will be (going by current specs)? If your monitor is X inches wide, put your eye X/2 inches in front of the monitor’s center — that’s about what it will look like. If you want to play a first-person game from that viewpoint and have it look right, set the horizontal field of view to 90 degrees.